Contribution Guide
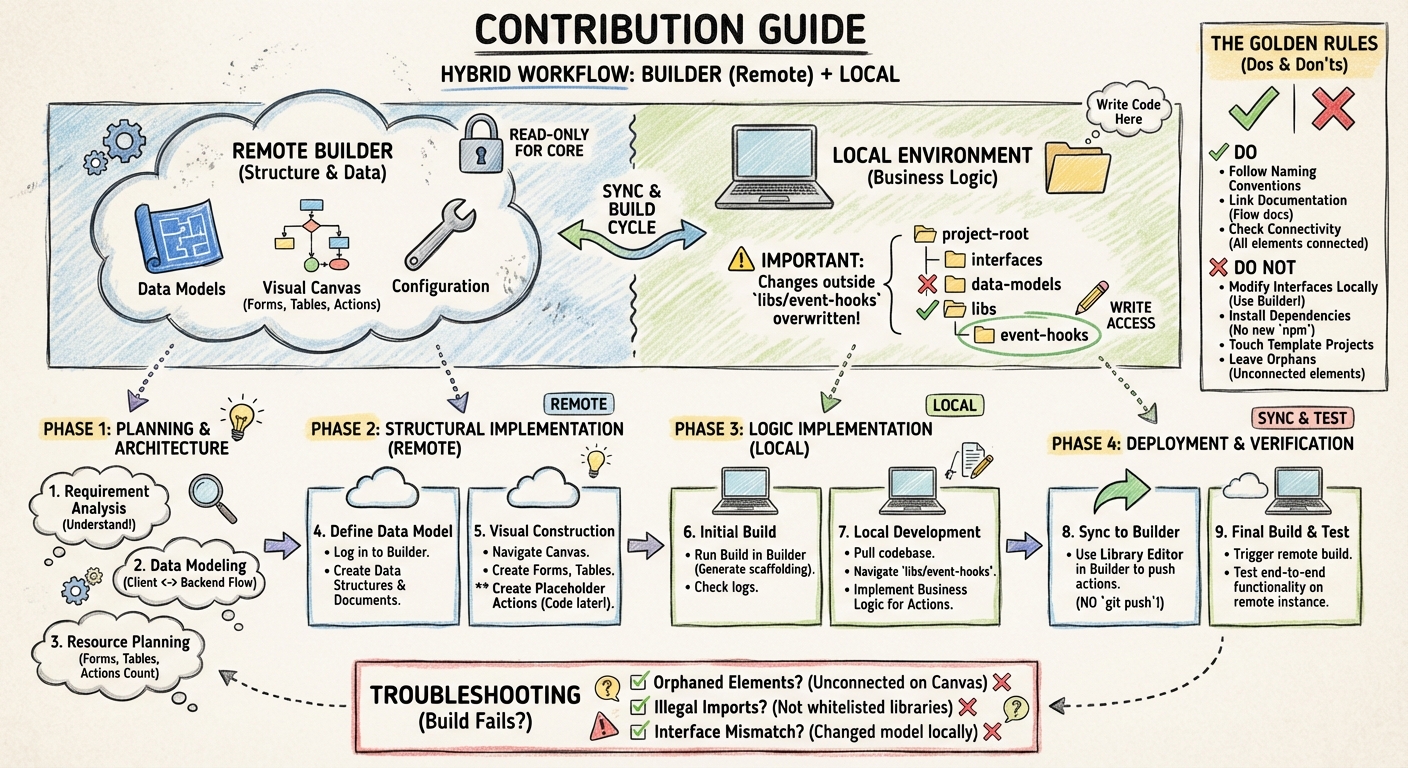
Welcome to the development guide. This document outlines the hybrid workflow required to build applications using our platform. We utilize a split-development model: structure and data are managed in the Builder, while business logic is written Locally.
1. Core Concepts & Constraints
Before starting, it is crucial to understand the boundaries between the local environment and the remote Builder.
The Golden Rules
✅ DO:
- Follow Naming Conventions: Adhere strictly to existing patterns for variables, functions, and files. See the Naming Conventions guide.
- Link Documentation: Always select flow documents for every Canvas Element you create.
- Check Connectivity: Ensure all Canvas Elements are connected to a flow.
❌ DO NOT:
- Modify Interfaces Locally: Never update interfaces in your IDE. Always use the Builder.
- Install Dependencies: Do not install new
npmmodules or import external libraries. You must use the provided environment. - Touch Template Projects: Do not edit template projects without explicit permission.
- Leave Orphans: Never leave unconnected elements on the Canvas; this will break the build.
2. Directory Structure
While you will pull the full project locally, you have write access to only one specific directory.
⚠️ Important: Changes made outside the folder listed below will be overwritten or ignored.
- Write Access:
apps/api/src/app/hooks - Read-Only: All interfaces, data models, and core configurations (managed via Builder).
Hooks are organized in a collection → hook hierarchy:
apps/api/src/app/hooks/
├── my-collection/
│   ├── collection.json           ← collection metadata
│   ├── my-hook-name/
│   │   ├── hook.json             ← hook metadata
│   │   ├── context.md            ← hook description
│   │   └── my-hook-name.my-collection.hook.ts
│   └── another-hook/
│       └── ...
Each hook directory contains three files:
hook.json: Hook metadata (name, slug, path, version, concurrency, timeout, etc.)context.md: Brief description of what the hook does.hook.ts: The actual business logic implementation
3. Development Workflow
Follow this lifecycle for every new feature or update.
Phase 1: Planning & Architecture
- Requirement Analysis: Fully understand the business requirement before touching the builder.
- Data Modeling: Plan your data structure. Determine how data flows between the client and the backend.
- Resource Planning: Map out exactly how many Forms, Tables, and Actions are required to fulfill the request.
Phase 2: Structural Implementation (Remote)
-
Define Data Model:
- Log in to the Builder.
- Create your Data Structures and Data Documents.
-
Visual Construction:
- Navigate to the Canvas.
- Create the visual elements (Forms, Tables).
- Create placeholder Actions on the canvas. Note: You will write the code for these later.
Phase 3: Logic Implementation (Local)
- Initial Build: Run a build in the Builder to generate the necessary scaffolding. Follow the logs to ensure success.
- Local Development:
- Pull the codebase to your local machine.
- Navigate to
apps/api/src/app/hooks. - Implement the business logic for the actions created in Phase 2.
Phase 4: Deployment & Verification
-
Sync to Builder:
- Use the Library Editor within the Builder interface to push your action contents.
- Note: Do not simply git push; use the Builder's sync mechanism.
-
Final Build & Test:
- Trigger a new build on the remote environment.
- Test the functionality on the remote instance to verify end-to-end success.
4. Troubleshooting
If the build fails during Phase 3 or Phase 4, check the following:
- Orphaned Elements: Did you leave an element on the canvas without a connection line?
- Illegal Imports: Did you attempt to import a library that is not whitelisted?
- Interface Mismatch: Did you attempt to change a data model locally instead of in the Builder?